Short and sweet
April 26 2011 – thisisknit
Short rows are a very good way of adding shape to your knitting: the toes of toe-up socks, bust-shaping in jumpers, anywhere that you want your knitting to mould itself to a curve. They're really easy to do, but pictures work better for explaining them than words, so here's a photo tutorial.
In the pictures below, we've used yarns of two different colours to highlight what's going on. In practice, the knitting would probably all be one colour, but if you want to follow along, using a different colour can help you understand how the process works. So if you want to knit along with us here, cast on twenty or so stitches and work five or six rows of stocking stitch. At the beginning of a knit round, start knitting with the second colour, and work six or seven stitches.
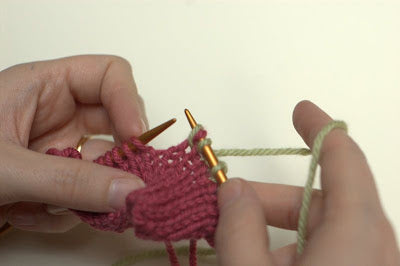
 Bring the yarn to the front of the work as if you were going to purl the next stitch.
 Slip the next unworked stitch from the lefthand to the righthand needle.
 Bring the yarn in front of the unworked stitch, and back to the rear of the work, wrapping the yarn round the stitch like a little scarf.
 That's the "wrap" part of wrap and turn completed. Now turn the work around completely so that you're looking at the other side of it (in our example, the side with all the purl bumps).
Without working it, slip the stitch you just wrapped back to the right hand needle, and then work to the end of the row.
 When you reach it, turn the work as usual, and inspect what's in front of you. Note the wrapped stitch, wearing its little scarf, and the way the right hand side of the work is now two rows taller than the left. Those two rows are short rows - they don't go all the way across the work, and they change the shape of the fabric.
 Now you just need to work the wrap, so you don't get an unsightly hole in your fabric. Work across to the wrapped stitch.
 Slip the wrapped stitch to the right hand needle purlwise. Poke the tip of your left hand needle under the wrap...
 ... and lift the wrap up onto the right hand needle so it's sitting there beside the unworked stitch.
 Now you just knit the two together - the stitch and its wrap. This closes up any potential hole left by the wrap and makes your work all neat and tidy.
 Then you just continue along the row as usual.
 When you've worked on a bit, stop and have a look at what's happened. The right hand side of the work has got taller than the left by three rows, and the place where you made the magic happen has no gaps or lumpy bits.
If you're working in garter stitch, short rows are even simpler. Because the bumpy fabric hides a multitude, there's no need to lift the wrap and work it. Just wrap, turn, and then knit straight past where the wrapped stitch is when you come back.
 Bring the yarn to the front of the work as if you were going to purl the next stitch.
 Slip the next unworked stitch from the lefthand to the righthand needle.
 Bring the yarn in front of the unworked stitch, and back to the rear of the work, wrapping the yarn round the stitch like a little scarf.
 That's the "wrap" part of wrap and turn completed. Now turn the work around completely so that you're looking at the other side of it (in our example, the side with all the purl bumps).
Without working it, slip the stitch you just wrapped back to the right hand needle, and then work to the end of the row.
 When you reach it, turn the work as usual, and inspect what's in front of you. Note the wrapped stitch, wearing its little scarf, and the way the right hand side of the work is now two rows taller than the left. Those two rows are short rows - they don't go all the way across the work, and they change the shape of the fabric.
 Now you just need to work the wrap, so you don't get an unsightly hole in your fabric. Work across to the wrapped stitch.
 Slip the wrapped stitch to the right hand needle purlwise. Poke the tip of your left hand needle under the wrap...
 ... and lift the wrap up onto the right hand needle so it's sitting there beside the unworked stitch.
 Now you just knit the two together - the stitch and its wrap. This closes up any potential hole left by the wrap and makes your work all neat and tidy.
 Then you just continue along the row as usual.
 When you've worked on a bit, stop and have a look at what's happened. The right hand side of the work has got taller than the left by three rows, and the place where you made the magic happen has no gaps or lumpy bits.
If you're working in garter stitch, short rows are even simpler. Because the bumpy fabric hides a multitude, there's no need to lift the wrap and work it. Just wrap, turn, and then knit straight past where the wrapped stitch is when you come back.


6 comments
Thanks for a great tutorial. I knit my first short rows on the ears of an elephant – Elijah – and although I missed picking up some of the wraps on the back of his ears I’m pretty happy overall.
It works exactly the same way – repeat your knits and purls all the way over to the stitch you’re told to wrap, then wrap it. If the last stitch before the wrapped stitch was a purl, then bring the yarn to the back of the work, slip the stitch you’re going to wrap, bring the yarn back to the front and turn the work. If the last stitch before the wrapped stitch was a knit, bring the yarn to the front, slip the stitch you’re going to wrap, bring the yarn back to the back and turn the work. After you’ve turned, slip the wrapped stitch and then knit the knits and purl the purls back in the other direction. On the next row, knit the knits and purl the purls until you reach the wrapped stitch. Knit it or purl it together with its wrap, depending on what the rib’s telling you to do, and then continue as normal.
Please can you tell me how this works in 2 × 2 ribbing?
Now I see where I have been going wrong. I hadn’t been picking up and knitting the wrap.
Thank you for such clear instructions.
[…] is Knit has an excellent and clear short row tutorial; had a 10 day sale; a super special spin on on Sunday 8th; announces another special May […]
[…] projects for our top-down classes). It’s got short rows for clever shaping too, so our Short and Sweet blog post might be […]